The valance has been hung and now all we have left to do for the window is add room-darkening floor-length curtains.
I had picked out the valance design in my head long before I went pattern shopping. Unfortunately, when I finally found the perfect pattern, it wasn't on sale and for some reason never could catch a sale price for it. So I turned to a good friend who also sews and I should have known to just ask her first. She had the exact pattern I needed and had already used it before.
The only changes I made to the pattern was that on the back, for the lining, I used ivory-colored black-out fabric in order to keep the light low. Because I used a curtain rod that "wraps around" the window, I shortened the length of the curve of the valance and added more length to the straight sides so that it will "wrap around" the curtains once we get them hung.
So here is the partially-finished window...note that eventually, the side edges will wrap around the curtains hung from behind the valance. Oh, and the walls are not pink. :)
Since we didn't want to crowd Lil Man's room with a diaper changing table, we opted for a pad on the floor that can be pulled out from under the crib when needed. However, I needed something to hold all of the diapers, wipes, creams, lotions, on and on...so I went looking for something to do the job.
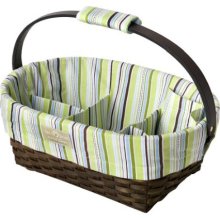
I fell in love with the diaper basket-caddies that pottery barn kids and other high-end stores make. they are perfect for diaper changes that occur in more than one location.
...but I didn't want to spend a bunch. So I decided to make my own!
I made a square fabric "basket" with two pockets on each side and a carrying strap, all without a pattern or a clue on how the finished product would turn out. But I am really, really happy with the end result!
Here is what it looks like:
The crib finally arrived this past weekend and we put it together last night. I woke up this morning just dying to try out all the nursery bedding I made for Lil Man.
And then.....ack! The crib skirt did not fit right!
Because I made continuous pleats at the corners, there was no place for the skirt to hang down because of the metal brackets that were attached to the crib. Basically, I needed to cut the pleats at the corners right down the middle so that the crib skirt could drop. Easy fix, right?
Not so much.
The metal braces holding the mattress support to the crib are a couple of inches wide, meaning the skirt would not fit right at the corners. In my desperation, I pondered just stapling the crib skirt to the bottom of the frame and calling it a day, but instead I cut the pleats and it fits well enough for now.
The bumper pads fit perfectly, except that because the crib we bought has a thick wooden piece in the middle, the ties at the middle would need to be moved to either side. I did this by removing the middle ties and adding some extra ties to each side of the middle part of the bumper pad. No problem at all.
Here is the finished product...
What should have been the easiest part of making the nursery bedding turned out to be the most annoying project I have ever done. Not difficult, but just time consuming and tedious. Instead of just making straight panels for the crib skirt, I decided to make them with pleats and inside the pleats would be a coordinating fabric. It took WAY more fabric than I had anticipated, therefore using up all the fabric I was going to use for the window valance. We're talking hundreds of inches of fabric that was eventually folded to make pleats and then pinned and sewed to a piece of muslin, which was cut to the crib mattress measurements.
Here is what the mile-long crib skirt looked like, draped over my ironing board...
this picture does not do the length of fabric justice. there is more piled to the left, out of the field of focus.
I don't have a picture of the finished project yet because we have no crib to put it on. We should be ordering one soon. I'm pretty sure I will have a heart attack if the crib skirt doesn't fit, either.
Here are some basic instructions for a pleated crib skirt that I loosely followed with my own measurements for this project. It's a great starting point for making a crib skirt or a bed skirt.
The first part of the nursery bedding is done: The bumper pads!
Below you will find a quick tutorial on how I made them and some pictures.
I'll be honest, I cheated and bought pre-cut batting specifically sized for the crib bumper. I am so glad I did. I even got the batting on sale for 50% off, so I only spent about $13 for all of the batting. Instructions come with the batting, but I did not follow them since I wanted to tweak the pattern a bit.
1. I cut 2 pieces of my main fabric 27" x 11 3/4" and 2 pieces 53" x 11 3/4" for the bumpers.
2. I cut 20 pieces of coordinating fabric 2" x 20" for the ties.
cut to be "tied"
3. I cut 2 pieces of coordinating fabric 2" x 54" and 2 pieces 2" x 28" for the piping. I only added piping to the top edge since it probably wouldn't show on the other edges anyway.
piping cord and fabric
4. I did the piping first, by wrapping the piping with the fabric and sewing right next to the cord with a zipper foot. Further instructions for piping here.
5. I did the ties next, by pressing 1/4" to the wrong side on all edges. Then I folded in half and edge stitched all the way around.
all of the ties completed!
6. I pinned the piping to the right side top edge of my main fabric, with edges together. I sewed it to the main piece using 3/8" seams.
7. I folded the ties in half lengthwise and pinned them to the corners (above the seam allowances on the bottom and within seam allowances on the sides) on the right side of each main piece. On the longer pad pieces, I also sewed a tie to the top and bottom at the 26 1/2" mark (middle.) I pinned all of the ties so they would not get caught in the stitching.
8. I then pinned the main pieces, right sides together. I stitched the tops first where the piping was, and used the stitches already in place as my guide, using a zipper foot. I continued to stitch all the way around, leaving a 8-10" hole in the bottom edge to slide the batting in place.
9. I trimmed each corner and leftover piping away.
10. I turned the covers to the right sides out and slid the batting into the covers. I then pressed the seam allowances down in the open edges and stitched the edges closed.
Congrats, you are done with your bumper pads!
When the Princess saw them, she exclaimed, "Ooooh! My brother will love them! They're sooo cute!" And then she kissed one of the pads. Ha! (She just turned 3.)
If you are at all interested in seeing pictures of my sewing and crafting projects over the years, click here. This album shows my very earliest projects up to a year or so ago. (Don't judge me on the earlier projects! I was just learning how to sew and embroider!) ;-)


