Living in a hot climate, I sure do love having a back porch. It's just too hot to go out in the sun for at least two months of the year. My kids love to play out there, and in the spring and fall, I especially love to entertain outdoors. However, I've been wanting to make our back porch more of a cozy living space rather than a boring place to sit in the shade. I've also wanted to add something for privacy, without adding curtains or blinds on the inside of our house. So i'm starting a DIY project to spruce up our back porch on a very strict budget: keeping it around $100.
Here's the before pictures:
Thursday, July 28, 2011
Latest Baby Items
Lots of my friends are having babies, so I'm staying pretty busy just making gifts for them right now! Here are a few of the latest baby items I've made in the past few weeks:
This last burp cloth, for Grace, I added "taggie"-type ribbon at the bottom to double as spit-up-catcher as well as entertainment for baby. :)
Taggie Blanket
This blanket is minky on one side and soft flannel on the other with plenty of ribbon "tags" to keep Baby busy!
Monday, April 11, 2011
Diaper Bags
Since Lil Man was born this past winter, I've slowly been working my way back into sewing. The biggest challenge is finding the time to do it...Lil Man is sleeping in the master bedroom currently, and that's where my machines are. We hope to get him into his own room soon! It's also taken some getting used to caring for two kids rather than one during the day. It doesn't leave much time for anything else!
But here are a few diaper bags I've completed over the past couple of months...
Monday, December 27, 2010
The Nursery is Complete!
...and just in time! Lil Man was born on the 22nd.
Here are the pictures. The only thing left to do are to fill those empty picture frames!
![]() |
| pillows for the futon |
![]() |
| the valance |
Friday, December 3, 2010
Nursery Valance
The valance has been hung and now all we have left to do for the window is add room-darkening floor-length curtains.
I had picked out the valance design in my head long before I went pattern shopping. Unfortunately, when I finally found the perfect pattern, it wasn't on sale and for some reason never could catch a sale price for it. So I turned to a good friend who also sews and I should have known to just ask her first. She had the exact pattern I needed and had already used it before.
The only changes I made to the pattern was that on the back, for the lining, I used ivory-colored black-out fabric in order to keep the light low. Because I used a curtain rod that "wraps around" the window, I shortened the length of the curve of the valance and added more length to the straight sides so that it will "wrap around" the curtains once we get them hung.
So here is the partially-finished window...note that eventually, the side edges will wrap around the curtains hung from behind the valance. Oh, and the walls are not pink. :)
I had picked out the valance design in my head long before I went pattern shopping. Unfortunately, when I finally found the perfect pattern, it wasn't on sale and for some reason never could catch a sale price for it. So I turned to a good friend who also sews and I should have known to just ask her first. She had the exact pattern I needed and had already used it before.
The only changes I made to the pattern was that on the back, for the lining, I used ivory-colored black-out fabric in order to keep the light low. Because I used a curtain rod that "wraps around" the window, I shortened the length of the curve of the valance and added more length to the straight sides so that it will "wrap around" the curtains once we get them hung.
So here is the partially-finished window...note that eventually, the side edges will wrap around the curtains hung from behind the valance. Oh, and the walls are not pink. :)
Tuesday, November 30, 2010
DIY Diaper Caddy
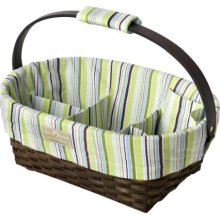
Since we didn't want to crowd Lil Man's room with a diaper changing table, we opted for a pad on the floor that can be pulled out from under the crib when needed. However, I needed something to hold all of the diapers, wipes, creams, lotions, on and on...so I went looking for something to do the job.
I fell in love with the diaper basket-caddies that pottery barn kids and other high-end stores make. they are perfect for diaper changes that occur in more than one location.
...but I didn't want to spend a bunch. So I decided to make my own!
I made a square fabric "basket" with two pockets on each side and a carrying strap, all without a pattern or a clue on how the finished product would turn out. But I am really, really happy with the end result!
Here is what it looks like:
I fell in love with the diaper basket-caddies that pottery barn kids and other high-end stores make. they are perfect for diaper changes that occur in more than one location.
...but I didn't want to spend a bunch. So I decided to make my own!
I made a square fabric "basket" with two pockets on each side and a carrying strap, all without a pattern or a clue on how the finished product would turn out. But I am really, really happy with the end result!
Here is what it looks like:
Subscribe to:
Posts (Atom)


